Step 1: Create an email message or reply to or forward a message that you received.

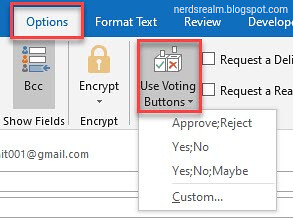
Approve Reject - Use when you need an authorization for an action. For example, you can send an email request to several recipients seeking their approval of a project proposal.
Yes; No - Use when you need either a yes or no. This is a good way to take a quick poll.
Yes; No; Maybe - Use when you don't want to limit the choices to yes and no. This voting option offers an alternative response.
Custom - Use to create your own custom voting button names. For example, you can ask your colleagues to choose a lunch between vegiterian or non vegiterian.

In the Properties dialog box, under Voting and Tracking options, select the Use voting buttons check box.

Click Close You will get a notification on the top saying that you added voting buttons to this message.

The receiver of the mail gets an additional message advising them to respond by using the vote button. That Vote button appears to vote for your choice.


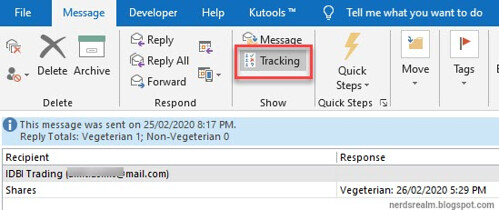
How To View Voting Results In Outlook?
An alternate way to track survey responses is to open the original email from the Sent Items folder and click “Tracking” under the Show section.