
To record and listen to audio associated with your screen recording, you'll need a sound card, microphone, and speakers.
Make sure there's enough disk space on your local drive to record and save your screen recording.
Step 1: Open the slide that you want to put the screen recording on.
Step 2: On the Insert tab of the ribbon, select Screen Recording.


Step 4: Click Record (Windows logo key+Shift+R).
Tip: Unless you pin the Control Dock to the screen, it will slide up into the margin while you record. To make the unpinned Control Dock reappear, point the mouse cursor at the top of the screen.
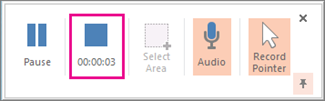
Step 5: To control your recording:
- Click Pause to temporarily pause the recording (Windows logo key+Shift+R).
- Click Record to resume recording (Windows logo key+Shift+R).
- Click Stop to end your recording (Windows logo key+Shift+Q).
To save the recording itself as a separate file on your computer, right-click the picture on the slide that represents the recording, and select Save Media as. In the Save Media As dialog box, specify a file name and folder location, then click Save.
