screenshottitle 

There are a few ways to turn on AssistiveTouch

Method 1

Step 1: Launch Settings from your Home screen. 

Step 2: Tap Accessibility.

Step 3: Choose Touch.

iPhonexAssistivetouch01

Step 4: Tap AssistiveTouch to turn it on.

Step 5: Toggle AssistiveTouch.

iphonexassistivetouch02

Method 2 

Note: Before using this option, make sure your device has Siri enabled.

Method 2: Use "Hey Siri" to say, “Turn on AssistiveTouch.”

assistivetouchsiri

For older Model iPhones/iOS

Method 1

Step 1: Launch the Settings app on your iPhone or iPad.

Step 2: Tap on General.

Step 3: Tap on Accessibility.

Step 4: Tap on AssistiveTouch under the Physical & Motor section — it's towards the bottom. Turn On AssistiveTouch.

assistivetouch03

Method 2 

Step 1: Go to Settings > General > Accessibility and scroll down to Accessibility Shortcut. 
 
Step 2: Under the triple-click the Home button for option, select Assistive Touch.

assistivetouch4

Now you can turn the Assistive Touch on or off by holding down the Home button three times.
WhatsApp

WhatsApp on Android and iPhone directly integrates with your contact book. As long as a contact is on WhatsApp, they’ll show up in the app. But you can also quickly add a contact to WhatsApp directly in the app. 

Step 1: Open WhatsApp.

Step 2: Go to the Chats tab.
 
Step 3: Tap New chat.

newcontactwhatsappandroid1

Step 4: Tap New Contact.

 
newcontactwhatsappandroid2

You’ll now see all of the usual fields. Type in their name, company details, and their phone number.

From there tap the “Save” button.
gdoctopdf

Get your Google Doc converted to PDF file format instantly online without installing any software.

Step 1: Open your document in Google Docs or create a new one.

Step 2: Click File from the menu.

Step 3: Go to Download as and select PDF Document in the pop-out menu.
 
gdictopdf01

Depending on the browser you’re using, access your downloads as you normally would. You should see your newly created PDF file.
WhatsApp

Step 1: Open WhatsApp.

Step 2: Go to the Chats tab.

Step 3: Tap New Message icon on top-right corner.
 
newcontactwhatsappiphone1

Step 4: Tap New Contact.
 
newcontactwhatsappiphone2

You’ll now see all of the usual fields. Type in their name, company details, and their phone number.

From there tap the “Save” button.

The Start Menu is the central hub for everything in Windows 10, and because of that, its default look is very "stock".

The good news is there are plenty of ways to customize the Start Menu to make it fit your personal style. From resizing tiles, to changing the color, and even picking what folders you see, we'll show you all the ways you can change it up.

How to pin an application to the Start Menu in Windows 10

If you want an application to appear in your Start Menu, you can easily pin it from anywhere on your computer. In this example we will just use an application on the desktop; however, the process is the same from anywhere on your Windows 10 PC.

Step 1: Right click on the application you want added to the Start Menu.

Step 2: Click on Pin to Start.


How to unpin an application from the Start Menu in Windows 10

Step 1: Click on the Start Menu. It's the Windows icon in the bottom left corner.
Right click on the application you want to unpin.

Step 2: Right click on the application you want to unpin.


Step 3: Click on Unpin from Start.


How to change the size of tiles in the Start Menu in Windows 10

Step 1: Click on the Start Menu. It's the Windows icon in the bottom left corner.

Step 2: Right click on the application you want to resize.


Step 3: Click on Resize.

Step 4: Click on the option you want. They are as follows:

  • Small: This is the size of the Cortana tile in our example below.
  • Medium: This is the size of the Skype video tile in our example below.
  • Wide: This is the size of the Store tile in our example below.
  • Large: This is the size of the Mail tile in our example below.


How to move tiles in the Start Menu in Windows 10

Step 1: Click on the Start Menu. It's the Windows icon in the bottom left corner.

Step 2: Click and hold on the tile you want to move.


Step 3: Drag the tile to the position you want.

Step 4: Let go.


How to turn off live tiles in the Start Menu in Windows 10

Live tiles are the tiles that show information on them while in the Start Menu. It almost looks like a slideshow and if you don't like this feature, you can turn it off.

Step 1: Click on the Start Menu. It's the Windows icon in the bottom left corner.

Step 2: Right click on the live tile you want to turn off.


Step 3: Click on More

Step 4: Click on Turn live tile off.

How to change the color of the Start Menu in Windows 10

Step 1: Click on the Start Menu. It's the Windows icon in the bottom left corner.

Step 2: Click on Settings.


Step 3: Click on Personalization.

Step 4: Click on Colors.


Step 5: Click on the color you want.


How to add folders to the Start Menu in Windows 10

On the left side of the Start Menu (not the side with the tiles) you can add certain Windows 10 folders to show up there, making it quicker to access them. By default the File Explorer and Settings are the only folders listed there.

Step 1: Click on the Start Menu. It's the Windows icon in the bottom left corner.

Step 2: Click on Settings.


Step 3: Click on Personalization.

Step 4: Click on Start.


Step 5: Click on Choose which folders appear on Start.

Step 6: Click on the switch under the folder you want to add.


You can easily reverse this action by following these exact same steps.

How to rename groups of tiles in the Start Menu in Windows 10

In the Start Menu, you will notice titles above groups of tiles. The default titles are "Life at a glance" and "Play and explore." You can change these headings at anytime. 

Step 1: Click on the Start Menu. It's the Windows icon in the bottom left corner.

Step 2: Click on the title you want to change.


Step 3: Delete the text in the type field.

Step 4: Type the new title you want.


msword

If you’re writing a Word document and need to insert placeholder text into a template or outline, there’s an easy way to generate sample text. Sure, you can type your own nonsense words to generate placeholder text, but Word actually has a built-in function to generate random text.

Generate Random Text with the Rand Formula

If you want to use random (yet coherent) text as filler content in your Word document, you can use the random content generation formula provided by Word.

The first method is to simply type in the following formula:

 =Rand()

This will automatically generate five paragraphs, each containing three sentences.

randomtextword1

Word generates by filling in what’s between the parentheses. To do that, you’ll use =Rand(x,y), where x is the number of paragraphs and y is the number of sentences in each paragraph.

For example, if you want seven paragraphs that each contain four sentences, you’d use the following formula:

=Rand(7,4)

Generate Lorem Ipsum Text with the Lorem Formula

The same rules apply here as the previous method. Type in =Lorem() and then hit Enter, and Word will create five paragraphs of Lorem Ipsum text, each containing three sentences.
 
randomtextword2

You can modify the amount of text the same way as with the rand formula, too. If you want four paragraphs that each contain nine sentences, you would type the following formula and then hit Enter:

=Lorem(4,9)

Generate “Quick Brown Fox” Text with the Old Rand Formula

Type in the following formula and hit Enter:

=rand.old()

The default for this method is three paragraphs that each contain three sentences.

As with the other methods, though, you can fill those parentheses to get more precision. For example, =rand.old(5,5) would generate five paragraphs that each repeat that sentence five times.
 
randomtextword3
pptlive

With Live Presentations in PowerPoint, audience members can see a presentation on their devices and read live subtitles in their preferred language while you speak. 

For starting a live presentation, you must have a Microsoft 365 account to access PowerPoint Live with PowerPoint.

Step 1: To get started with Live Presentations open your slide deck in PowerPoint for the web and go to the Slide Show tab.

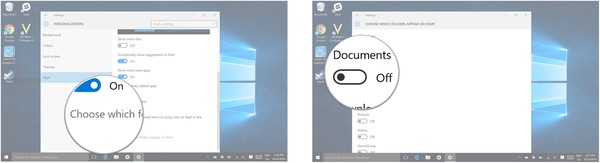
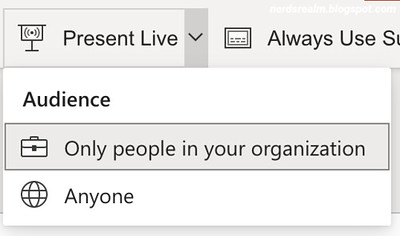
Step 2: First, check your audience setting. Click the drop arrow next to Present Live to select who should be able to connect to this presentation.
 
live1

Only people in your organization - This is the default option for presenters signed in with their work or school account. It limits access to people signed in with accounts in the same Microsoft 365 organization (work or school) the presenter is in.

Anyone - If you're presenting to an audience that includes people who are not in your organization you'll need to select this one.

Step 3: Next, select Present Live and your presentation will begin with a screen that shows a customized QR code. You can also start your Live presentation from the slideshow toolbar:
 
live2

Please note: Your audience can point their device cameras at the QR code, tap the link that appears over the QR code, and PowerPoint Live will load your presentation in their web browser. There's nothing for them to install.
 
live3

Tip: If they're having trouble using the QR code they can also just go to their browser and enter the short URL shown at the top of the presentation screen. 
 
The audience can connect from any device has that has an Internet connection and a browser: iOS, Android, Windows, or Mac.

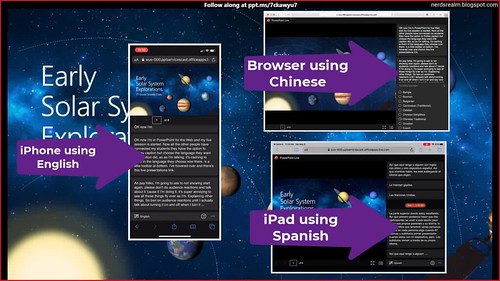
Subtitles in 60+ languages

Once your audience has loaded the presentation they will see your spoken words transcribed on the screen in near real-time. 

This is great for audiences when the acoustics of the venue aren't good, or if you have audience members who have difficulty hearing.

live4

If an audience member would like to have your words translated for them into a different language, they can tap the language indicator and select from one of more than 60 other languages. Once they've selected their language your spoken words will be machine translated into that language, and shown to them on their device as subtitles.

Each audience member can select the language of their choice.
 
live5

Reviewing previous slides

If an audience member wants to look back at one of your earlier slides that can do that using the slide control that appears on their screen just below the current slide. They can go all the way back to your first slide, but they can only go as far forward as the slide you're currently displaying, so you don't have to worry about them reading ahead in your deck.

Live feedback

If an audience member using PowerPoint Live wants to give you feedback as you go, they can tap the feedback button (which looks like a smiley face) towards the bottom right of their device screen. There they can select from a handful of different feedback types, from "like" to "puzzled" and more. Their selection will briefly appear on the presentation screen.
 
live6

Presentation evaluation

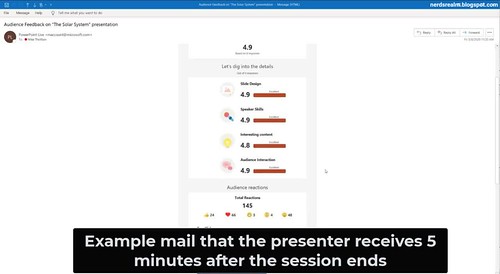
When you end the presentation audience members using PowerPoint Live will each get a short survey where they get to rate your slide design, speaker's skill, content, and interaction with audience on a scale of 1 to 5. They can add any other comments or feedback they might have and submit. This feedback is collected by Microsoft Forms where you can view the aggregated, anonymous, responses.
 
live7

Important: You can save the aggregated feedback email in your inbox, but the detailed audience feedback in Microsoft Forms isn’t kept indefinitely. If you want to keep the detailed feedback, go to the feedback form, select Open in Excel, and save the resulting Excel file.

Email summary

After the presentation you will get an email containing a summary of audience feedback responses, live reactions from the audience, and some recommendations on what to improve for the next time.
 
live8

Please note: For audiences accessing Live Presentations on their mobile devices it requires at least iOS version 11, or Android version 8. 

You can save the aggregated feedback email in your inbox, but the detailed audience feedback in Microsoft Forms isn’t kept indefinitely. If you want to keep the detailed feedback, go to the feedback form, select Open in Excel, and save the resulting Excel file.

Brushing up on QR Codes and URLs

For those who are not aware of the concept of QR Codes and URLs, they are as simple concepts as their spellings.

A QR Code is a ‘Quick Response’ code which, when scanned, gives the user access to some kind of information.

URL stands for ‘Uniform Resource Locator’, which is basically a web address which, when entered in a browser, takes you directly to the source of information.
new year

Wishing all my readers a very happy and prosperous New Year 2021. Time for a new beginning. I hope this is going to be a very special year for all of us. A new year brings new ideas, new hopes and of course courage to overcome all the new challenges.   

May this new year bring many new opportunities your way to explore every joy of life. I Hope this new year fills your life with happiness and perfect health and much more success and happiness.

As we wind up with the year 2020 and begin a new year, as always, I would like to express my sincere thanks to all the visitors, readers, followers of my blog for their encouragement, feedbacks, and support.