pptlive

With Live Presentations in PowerPoint, audience members can see a presentation on their devices and read live subtitles in their preferred language while you speak. 

For starting a live presentation, you must have a Microsoft 365 account to access PowerPoint Live with PowerPoint.
Step 1: To get started with Live Presentations open your slide deck in PowerPoint for the web and go to the Slide Show tab.

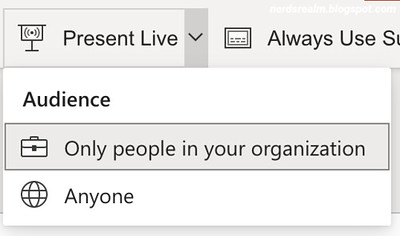
Step 2: First, check your audience setting. Click the drop arrow next to Present Live to select who should be able to connect to this presentation.
 
live1

Only people in your organization - This is the default option for presenters signed in with their work or school account. It limits access to people signed in with accounts in the same Microsoft 365 organization (work or school) the presenter is in.

Anyone - If you're presenting to an audience that includes people who are not in your organization you'll need to select this one.

Step 3: Next, select Present Live and your presentation will begin with a screen that shows a customized QR code. You can also start your Live presentation from the slideshow toolbar:
 
live2

Please note: Your audience can point their device cameras at the QR code, tap the link that appears over the QR code, and PowerPoint Live will load your presentation in their web browser. There's nothing for them to install.
 
live3

Tip: If they're having trouble using the QR code they can also just go to their browser and enter the short URL shown at the top of the presentation screen. 
 
The audience can connect from any device has that has an Internet connection and a browser: iOS, Android, Windows, or Mac.

Subtitles in 60+ languages

Once your audience has loaded the presentation they will see your spoken words transcribed on the screen in near real-time. 

This is great for audiences when the acoustics of the venue aren't good, or if you have audience members who have difficulty hearing.

live4

If an audience member would like to have your words translated for them into a different language, they can tap the language indicator and select from one of more than 60 other languages. Once they've selected their language your spoken words will be machine translated into that language, and shown to them on their device as subtitles.
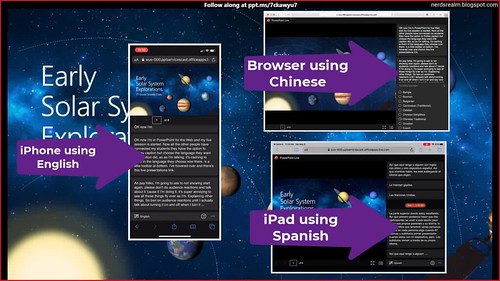
Each audience member can select the language of their choice.
 
live5

Reviewing previous slides

If an audience member wants to look back at one of your earlier slides that can do that using the slide control that appears on their screen just below the current slide. They can go all the way back to your first slide, but they can only go as far forward as the slide you're currently displaying, so you don't have to worry about them reading ahead in your deck.

Live feedback

If an audience member using PowerPoint Live wants to give you feedback as you go, they can tap the feedback button (which looks like a smiley face) towards the bottom right of their device screen. There they can select from a handful of different feedback types, from "like" to "puzzled" and more. Their selection will briefly appear on the presentation screen.
 
live6

Presentation evaluation

When you end the presentation audience members using PowerPoint Live will each get a short survey where they get to rate your slide design, speaker's skill, content, and interaction with audience on a scale of 1 to 5. They can add any other comments or feedback they might have and submit. This feedback is collected by Microsoft Forms where you can view the aggregated, anonymous, responses.
 
live7

Important: You can save the aggregated feedback email in your inbox, but the detailed audience feedback in Microsoft Forms isn’t kept indefinitely. If you want to keep the detailed feedback, go to the feedback form, select Open in Excel, and save the resulting Excel file.
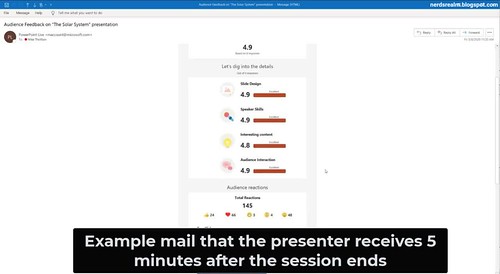
Email summary

After the presentation you will get an email containing a summary of audience feedback responses, live reactions from the audience, and some recommendations on what to improve for the next time.
 
live8

Please note: For audiences accessing Live Presentations on their mobile devices it requires at least iOS version 11, or Android version 8. 

You can save the aggregated feedback email in your inbox, but the detailed audience feedback in Microsoft Forms isn’t kept indefinitely. If you want to keep the detailed feedback, go to the feedback form, select Open in Excel, and save the resulting Excel file.

Brushing up on QR Codes and URLs

For those who are not aware of the concept of QR Codes and URLs, they are as simple concepts as their spellings.

A QR Code is a ‘Quick Response’ code which, when scanned, gives the user access to some kind of information.

URL stands for ‘Uniform Resource Locator’, which is basically a web address which, when entered in a browser, takes you directly to the source of information.
new year

Wishing all my readers a very happy and prosperous New Year 2021. Time for a new beginning. I hope this is going to be a very special year for all of us. A new year brings new ideas, new hopes and of course courage to overcome all the new challenges.   

May this new year bring many new opportunities your way to explore every joy of life. I Hope this new year fills your life with happiness and perfect health and much more success and happiness.

As we wind up with the year 2020 and begin a new year, as always, I would like to express my sincere thanks to all the visitors, readers, followers of my blog for their encouragement, feedbacks, and support.
Facebook

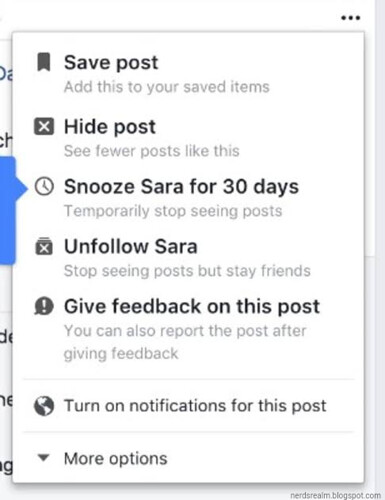
Snoozing a person, Page or group prevents you from seeing their posts in your News Feed for 30 days. The person, Page or group you've snoozed won't know that they've been snoozed.

To snooze a person, Page or group from your News Feed:

Step 1: Tap three dots in the top right of the post in your News Feed.

Step 2: Tap Snooze [Name] for 30 days.
 
fbsnooze1

To immediately undo Snooze [Name] for 30 days, tap Undo in the confirmation message.

To turn snooze off for a profile or Page:

Step 1: Go to the profile or Page.

Step 2: Tap three dots in the top right of the profile or Page.

Step 3: Tap Snoozed.
 
fbsnooze2

To turn snooze off for a group, go to the group and tap Joined > End Snooze.

Note: You can only snooze someone from a post in your News Feed.
christmas-card

I wanted to take this opportunity to wish every one of you a very merry Christmas. It's been truly wonderful reading all your feedback on the comments section of the blog, on Facebook and Twitter account. 

Have a wonderful tech-filled break, and see you in the new year.
Here are two possible ways in which you can adjust the screen rotation of your Windows 10 device.

Method 1:

Step 1: By pressing the Win key on your keyboard or clicking the Win icon on the left-lower corner of the desktop. Then click the Settings app to access it.
 
wintensetting02

Step 2: click on System –> Display 

OR simply right-click the Desktop and select Display settings.

Step 3: Click the Display Orientation drop-down box and choose an option. You will see this option under Scale and layout.
 
display1

Note: If you have multiple monitors, make sure you have selected the correct monitor at the top of the Display menu first.

You can choose between any of the following options:

  • Landscape mode: Choosing this will rotate your screen to the default orientation.
  • Portrait mode: Choosing this will rotate your screen 270 degrees, so your screen will be vertical.
  • Landscape (flipped) mode: Choosing this will flip your screen upside-down or 180 degrees.
  • Portrait (flipped) mode: Choosing this will rotate your screen 90 degrees, so it is vertical and upside-down.

 Press Esc on your keyboard if you want to go back to the screen orientation you had before.

Method 2:

How to Rotate Screen With Keyboard Shortcuts You can rotate your Windows 10 PC screen with keyboard shortcuts.

Hold down and press the Ctrl + Alt + Up arrow. Holding down and pressing these keys will rotate your screen to its default position, which is the horizontal orientation.

display2

Hold down and press the Ctrl + Alt + Down arrow. This will flip your screen upside-down or 180 degrees.

display3

Hold down and press the Ctrl + Alt + Left arrow. This will rotate your screen 270 degrees.
 
display4
 
Hold down and press the Ctrl + Alt + Right arrow. This will rotate your screen 90 degrees.

display5

windows32bitor64bit01

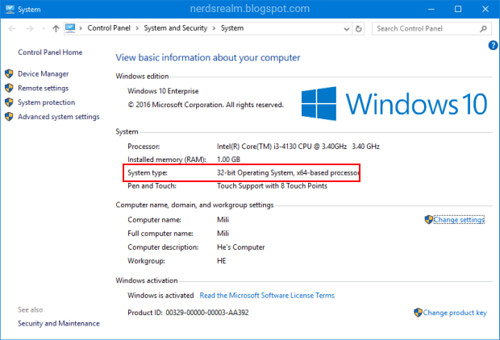
The terms 32-bit(x86) and 64-bit(x64) refers to the way a computer's processor (also called a CPU), handles information. The 64-bit version of Windows handles large amounts of random access memory (RAM) more effectively than a 32-bit system. 

System Type tells you whether you're using the 32-bit version of Windows 10 or the 64-bit version. It also tells you whether your PC is compatible with the 64-bit version or not.

The 64-bit operating system, x64-based processor indicates you're using a 64-bit version of Windows 10 on a 64-bit processor.

The 32-bit operating system, x64-based processor indicates you're using a 32-bit version of Windows 10, but you could install the 64-bit version on your hardware if you preferred.

Generally speaking, to run a 64-bit version of Windows, your computer must have a 64-bit-capable processor. 64-bit versions of Windows can run 32-bit software, but 32-bit versions of Windows can’t run 64-bit software. 
 
Way 1: Use Windows logo+Pause Break keys on the keyboard to open system.
 
systemtype01-01

systemtype01-02

Way 2: 
Step 1: Open Settings, then click on the System icon. 

Step 2: Select About on the left side.

systemtype02

Look under PC for System type to see if you're running a 32-bit or 64-bit version of Windows 

Way 3: 
Step1: Press Win + R keys to open the Run dialog, type msinfo32, and hit Enter.

systemtype03-01

Step 2: In System Summary, look to see if your System Type on the right side is either an x64-based PC or an x86-based PC.
 
systemtype03-02

Way 4: Open Command Prompt window.
In the command prompt, type systeminfo, and press Enter.
 
systemtype04
Winten

Here I have shared a short guide on How to Resize Your Start Menu in Windows 10. I hope you will find this guide helpful. 

Change the height of the Start menu

Step 1: Click on the Start Menu button. It's the Windows icon in the bottom left corner.

Step 2: Move your cursor to the top edge of the Start Menu so your cursor looks like a double-sided arrow.

Step 3: Click and drag up or down to resize the Start Menu.

Step 4: Let go.


Change the width of the Start menu

Step 1: Click on the Start Menu button. It's the Windows icon in the bottom left corner.  
Step 2: Move your cursor to the right edge of the Start Menu so your cursor looks like a double-sided arrow.

Step 3: Click and drag right or left to resize the Start Menu.

Step 4: Let go.


 How to make the Start menu full screen
 
winstartresize4

Step 1: Open the Settings app by pressing Win + I keys on your keyboard.

Step 2: Click on "Personalization".

Step 3: Select Start, and then turn on "Use Start full screen", which is turned off on Windows 10 desktop/PC by default. The next time you bring up the Start menu, it will be full screen, filling the entire desktop.
 
winstartresize3
iPhonexbeyond

Step 1: Press the Side Button and the Volume Up button at the same time.

iphonexscreenshot01

Quickly release both buttons.

After you take a screenshot, a thumbnail appears temporarily in the bottom left-hand corner of your screen. Tap the thumbnail to open it or swipe left to dismiss it.
googledocs

Google Drive can also convert any PDF, JPG, PNG, or GIF into a document with fully editable text. Here’s how.

The process for converting PDFs and images to text is really easy, but good results depend on good source material, so here are some basic guidelines to follow: 

  • The text in your PDF or image should be a minimum of 10 pixels high.
  • Documents must be oriented right-side up. If they are turned left or right, make sure you rotate them first.
  • This works best if your file contains common fonts such as Arial or Times New Roman.
  • Images should be sharp and evenly lit with strong contrast. If they are too dark or blurry, you won’t get very good results.

The more complicated the image or PDF, the more trouble Google Drive may have converting it properly. It probably won’t have problems with font styles like bold and italics, but other things like lists, tables, and footnotes may not be retained.

Step 1: Open drive.google.com in your browser. You can click-and-drag the jpg, .gif, or .png with text from your file browser.
 
pdftogdoc02

or you can click New followed by File Upload and browse to the file you want to upload.
 
pdftogdoc01

Step 2: A dialog box displays the progress of the upload and when the upload is complete in lower right side of your screen. Click the “X” on the dialog box to close it. 

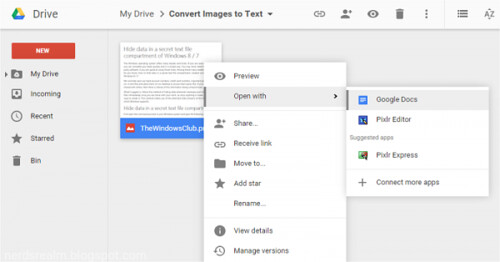
Step 3: Right-click on the image file in the file list and select Open With > Google Docs.
 
imagetogdoc1

You’ll end up with a Google Docs file containing the image at the beginning, followed by the text extracted from the image in an editable form. The results of conversions from images files are generally not as good as from PDF files, though.
 
imagetogdoc2

Note: Some formatting might not transfer: 

Bold, italics, font size, font type, and line breaks are most likely to be retained.

 Lists, tables, columns, footnotes, and endnotes are likely not be detected.
YouTube

The YouTube app for iOS allows you to enable and/or disable dark mode on your iPhone, iPad or iPod touch, and here are the steps you can take to achieve it.

Step 1: Open the YouTube app on your iOS device and tap on your profile photo at the upper right side of the screen.
 
YouTubedarkmodeios1

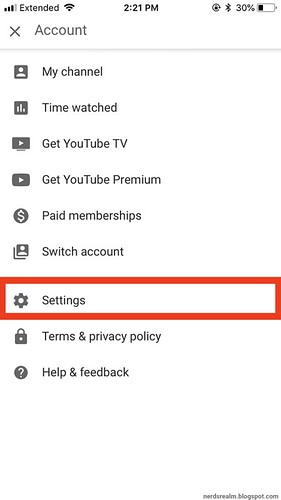
Step 2: In the menu, find Settings and tap to open the YouTube app settings for your iOS device.
 
YouTubedarkmodeios2

Step 3: Find Dark Theme and tap to toggle the switch on to enable Dark Mode.
 
YouTubedarmodeios3

Note: Enabling YouTube dark mode on iOS is device specific, which means that if you enable it on your iPhone, the dark theme will only be on your iPhone, and not across all your other iOS devices. You have to enable it on each iOS device if you want the dark mode appearance on your iPhone, iPad and iPod touch.

For iOS 13 (or newer) users:

Step 1: Select your profile picture
Step 2: Tap Settings
Step 3: Tap Appearance
Step 4: Select "Use device theme" to use your device's dark theme setting.