Gmail

Setting an automatic “out of office” reply for your emails is very helpful when you’re going away on vacation. This vacation responder lets people who email you know that you won’t be able to reply to them immediately.

Here’s how to set an out of office reply in Gmail on your computer. 

Step 1: Open your Gmail inbox.

Step 2: Then click the cog icon in the top-right corner of the page.

Step 3: Next, select See all settings.
 
vacares1

Step 4: Then scroll down and check the box next to Vacation responder on.

Step 5: Next, set your automatic reply dates. Check the Last day box and input the last day you want to send automatic replies. You can skip this step if you’re going to manually turn off automatic replies when you get back to the office. This might be more convenient if you’re not sure when you’ll be back.

Step 6: Then type your out of office message. This will be the automatic response sent to people from your company who email you while you’re away.

Step 7: Finally, click Save Changes.
 
vacares2

You can also check the box next to Only send a response to people in my Contacts box. If you don’t check this box, your out of office response will be sent to anyone who sends you an email. If you’re using a Gmail account from your company or school, you also have the option to send the automatic reply only to people in your organization. 

Note: Gmail automatically attaches your signature when it sends automatic replies. So, you don’t have to add your signature to your out of office message.

Gmail only sends a vacation response to each recipient once, unless the same person emails you again after four days or longer.
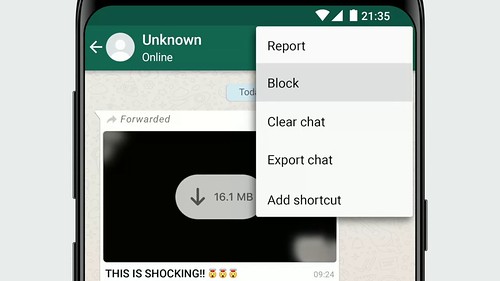
whatsappblock1

There are a couple of indicators that you may be blocked on WhatsApp:

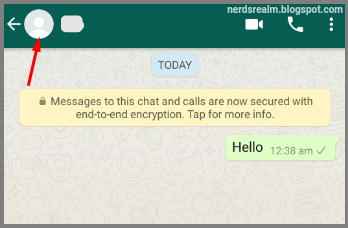
You can no longer see a contact's last seen or online in the chat window.
 
whatsappblock2

You do not see updates to a contact's profile photo.
 
whatsappblock3

Any messages sent to a contact who has blocked you will always show one check mark (message sent), and never show a second check mark (message delivered). 

Any attempt to place will not go through.

If you try adding that person in a WhatsApp group you will notice an error message.

If you see all of the indicators above for a contact, this could mean that the user is blocking you. However, there are other possibilities. WhatsApp has made this intentionally ambiguous in order to protect your privacy when you block someone.
Googledocs

Step 1: To do that, log into your Google Drive and open your collection of documents.

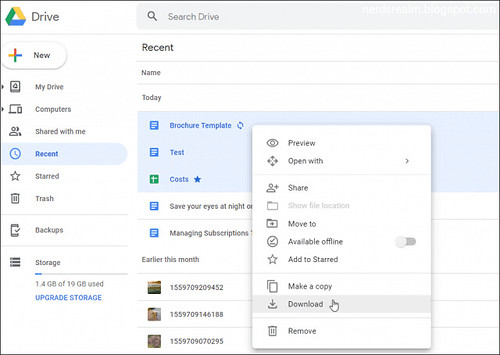
Step 2: Hold down Ctrl key (Cmd on macOS) and highlight the ones you need.

Step 3: Then right-click and select “Download” from the menu.
 
multiplegdoctoword1

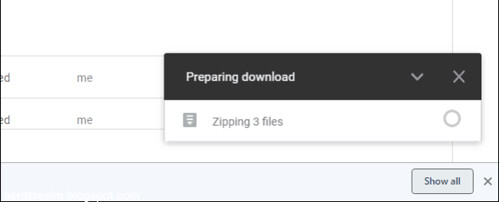
Google Docs will move all your documents into a Zip folder to download. Note that the amount of time it takes will vary depending on their size and your connection speed.
 
multiplegdoctoword2

The Zip file of docs will download to your computer in the appropriate Microsoft Office file format.
 
multiplegdoctoword3
Googledocs

Get your Google Doc converted to Word file format instantly online without installing any software.

Step 1: Open your document in Google Docs or create a new one.

Step 2: Click File from the menu.

Step 3: Go to Download and select Microsoft Word (.docx) Document in the pop-out menu.
 
gdoctoword1

Depending on the browser you’re using, access your downloads as you normally would. You should see your newly created Microsoft Word file.
Computer has two type of memory. One type is used in RAM modules which is DRAM OR Dynamic RAM.

DRAM is memory that uses capacitor to store data and these capacitors have to constantly and dynamically be refreshed often with electricity in order for them to store data but there is another type of memory that computer uses that doesn't constantly have to be refreshed and this memory is called SRAM or static RAM. 

SRAM is what is used in CPU Cache and because SRAM doesn't have to be constantly refreshed it is a lot faster then DRAM and it's also very expensive.
 
cache1

The CPU Cache is CPU's internal memory. It's job is to store copy of data and instructions from RAM that's waiting to be used by the CPU. CPU Cache holds common data that it thinks CPU is going to access over and over again because when CPU needs to access certain data it always checks the faster memory first to see if the data it needs is there. And if not then the CPU would have to go back to the slower primary memory or RAM to get the data it needs so that's why cache memory is so important. Therefore, storing the commonly required data in the cache is beneficial to increase the computation speed.
 
cache2

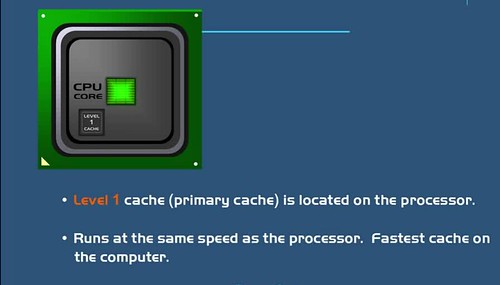
There are three types of cache. The level 1 cache is the smallest. It is located inside the CPU or the processor. So, it runs at the same speed as the CPU.
 
cache3

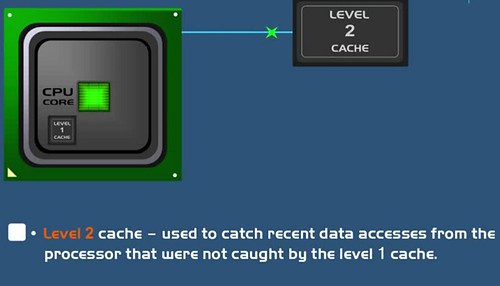
Level 2 and level 3 caches are external. In modern computers level 2 cache is also being located inside the CPU. Level 2 cache is larger than level 1 cache. If the required data is not available in level 1 cache, the CPU checks the level 2 cache.
 
cache4

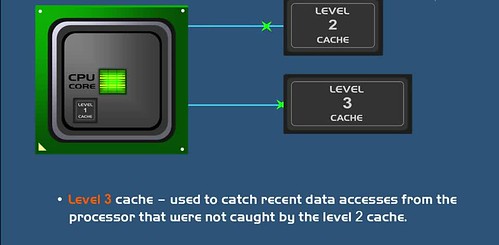
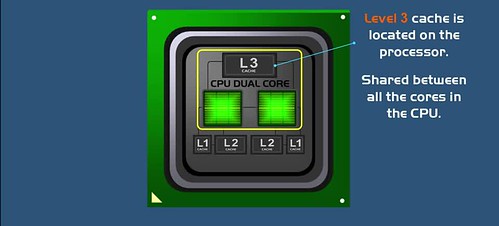
If the required data is not available in both level 1 and level 2 caches, the CPU checks the level 3 cache. If the required data is not available in any of these caches, the CPU will access the RAM. Level 1 cache is the fastest cache of all. A CPU can have multiple cores. A core is the execution unit of the CPU. Each core can have separate level 1 and level 2 caches. The level 3 cache is shared among all cores.
 
cache5

cache6

Speed
RAM is faster than secondary storage mediums, but it is not as fast as the cache. 

Cost
Although RAM is expensive, it is not expensive as a cache. Capacity The capacity of cache is smaller than RAM, which has a higher capacity.

Usage
The cache holds frequently used data by the CPU. RAM holds programs and data that are currently executed by the CPU.

Conclusion
Both cache and RAM are volatile memory. The difference between cache and RAM is that the cache is a fast memory component that stores the frequently used data by the CPU while RAM is a computing device that stores data and programs currently used by the CPU. In brief, the cache is faster and expensive than RAM.

If you want to resize the Start menu on Windows 10 to make it full screen, follow this simple tutorial.

Step 1: Open settings by pressing the Win key on your keyboard or clicking the Win icon on the left-lower corner of the desktop. Then click the Settings app to access it.

wintensetting02

Step 2: Click on "Personalization".

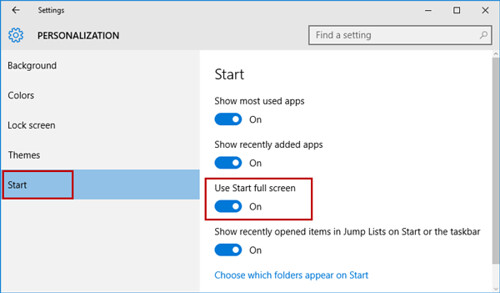
Step 3: Select Start, and then turn on "Use Start full screen", which is turned off on Windows 10 desktop/PC by default.

fullscreen1

The next time you bring up the Start menu, it will be full screen, filling the entire desktop.

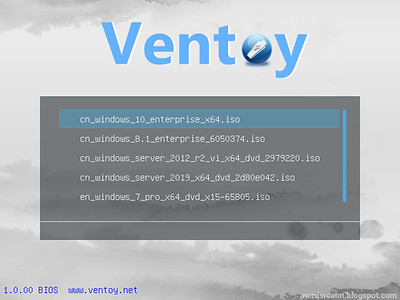
ventoy1

Did you know that you can install multiple Windows and Linux using the same USB stick, without having to format it twice?

A multi-boot USB flash drive means that instead of needing to create an individual bootable flash drive for each ISO, you can run multiple ISOs from a single bootable flash drive. There are quite a few free tools available designed specifically for the creation of multi-boot USB flash drives, However in this article, we’ll be checking out the new kid on the block, a brilliant free, open-source, and portable software called Ventoy.

Ventoy supports legacy BIOS and UEFI (with and without secure boot), MBR and GPT partition tables, which makes it kind of universal.

To use Ventoy, you need a USB drive (be it a USB stick, an external hard drive, a memory card, etc.) that is large enough to hold the ISO images you are going to use. For instance, the Linux Kamarada 15.1 ISO image is 1.5GB. If you are going to use just that image, you need at least a 2GB drive. The Windows 10 version 2004 ISO image is 4.9GB. To use both images, you need at least an 8GB drive, and so on.

In addition, you need a Windows or Linux PC to prepare the USB drive.

Before proceeding, please note that the USB drive will be formatted by Ventoy, so the data on the USB drive will be lost! If you want to keep the data on it, here's what you can do: copy the data to another location (e.g. to the computer), install Ventoy on the USB drive, then move the data back to the USB drive.

 It is also recommended that you remove any other storage devices connected to your computer (such as other USB sticks, external hard drives, memory cards, etc.) to prevent them from being formatted by mistake.

How to install Ventoy to the USB drive using Windows

Step 1: Start by downloading Ventoy for your operating system from the Ventoy releases page on GitHub:

https://github.com/ventoy/Ventoy/releases

Step 2: When the download is complete, extract the contents of the archive. To do this, you can use the wizard that comes with Windows itself or a free program such as 7-Zip.

ventoy2

Step 3: Enter the extracted folder and launch the Ventoy2Disk executable by double-clicking it.
 
ventoy3

Optionally, you can translate the Ventoy interface to your language by opening the Language menu and selecting the desired language.

To this tutorial, I’m going to stay with the default language, which is English (English).

Step 4: Select the USB drive from the Device list and click Install.
ventoy4

Step 5: Ventoy warns you of the risk of data loss. Click Yes.

ventoy5

Step 6: Double check you are formatting the right device and click Yes.
 
ventoy6

After a few seconds or minutes, Ventoy finishes installing itself to the USB drive. 

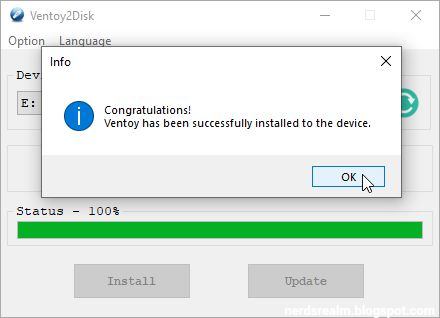
Step 7: You can click OK to dismiss that dialog box and close the Ventoy window. Before closing, observe that the program now informs you which Ventoy version is installed on the device.
 
ventoy7

Step 8: Now that your USB drive is ready, copy the ISO images you are going to use onto it.
 
ventoy8

Note that you can organize them inside a folder, to keep them separated from other files on the USB drive. During boot, Ventoy searches all the directories and subdirectories recursively to find all the ISO files inside the USB drive.

iPhonexbeyond

How to restart your iPhone X or 11

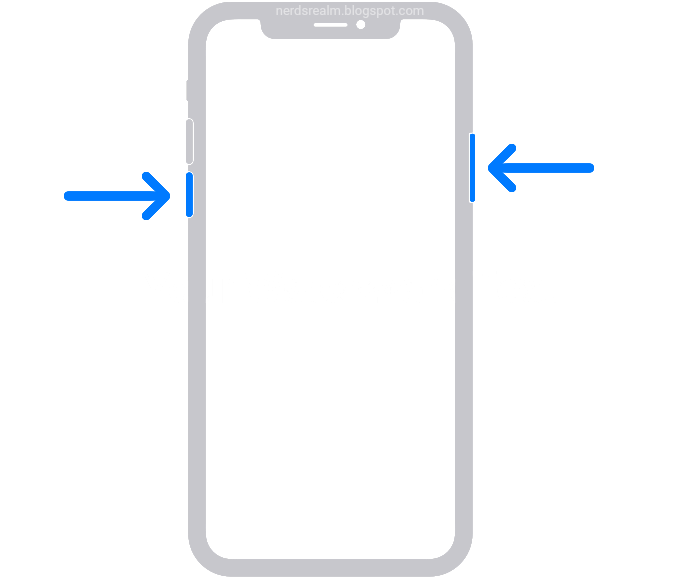
Step:1 Press and hold either volume button and the side button until the power off slider appears.

iphonexrestart

Step 2: Drag the slider, then wait 30 seconds for your device to turn off.

To your device back on, press and hold the side button (on the right side of your iPhone) until you see the Apple logo.

Using different media types during a PowerPoint presentation helps keep the audience entertained. Inserting an animated GIF in PowerPoint can capture attention and add humor when well-placed and relevant to the topic.

This tutorial will show you how to insert animated GIFs in PowerPoint presentations to demonstrate an activity, convey a message, or grab the audience’s attention.

Step 1: Start by opening PowerPoint and navigating to the slide where you want to add the animated GIF. Click on Insert in the top navigation and double click on Pictures. 

media1

Step 2: If you have an animated GIF on your computer, choose the file from its location and click Open.

When you play the slideshow during a presentation, the GIF is animated automatically.

Insert an Animated GIF In Powerpoint From Online Image Search

Step 1: Click on Insert in the top navigation and choose Online Pictures (PowerPoint 2013 and later.)

media2

Step 2: Search in the popup box for an image to use in your presentation. You can narrow your search by typing gif.
 
media3

By default, Creative Commons only is checked off. You only want to use images that are legal in your presentation so keep it checked.

Step 3: Select the image you want to use and click Insert to add it to your slide. Narrow your search even more by using specific keywords. For example, typing office GIF will only show animated images related to an office.
media4
screenshottitle 

There are a few ways to turn on AssistiveTouch

Method 1

Step 1: Launch Settings from your Home screen. 

Step 2: Tap Accessibility.

Step 3: Choose Touch.

iPhonexAssistivetouch01

Step 4: Tap AssistiveTouch to turn it on.

Step 5: Toggle AssistiveTouch.

iphonexassistivetouch02

Method 2 

Note: Before using this option, make sure your device has Siri enabled.

Method 2: Use "Hey Siri" to say, “Turn on AssistiveTouch.”

assistivetouchsiri

For older Model iPhones/iOS

Method 1

Step 1: Launch the Settings app on your iPhone or iPad.

Step 2: Tap on General.

Step 3: Tap on Accessibility.

Step 4: Tap on AssistiveTouch under the Physical & Motor section — it's towards the bottom. Turn On AssistiveTouch.

assistivetouch03

Method 2 

Step 1: Go to Settings > General > Accessibility and scroll down to Accessibility Shortcut. 
 
Step 2: Under the triple-click the Home button for option, select Assistive Touch.

assistivetouch4

Now you can turn the Assistive Touch on or off by holding down the Home button three times.