pictureback01

In this step-by-step tutorial, learn how to use the best shortcut keys while in slideshow mode in Microsoft PowerPoint. 

Shortcut #1: White Screen

W (while in Slide Show Mode) will turn the screen completely white. Hit W once more, and you will return to your slide.

slideshort1

Shortcut #2: Black Screen

B (while in Slide Show Mode) will turn the screen completely black. Hit B once more, and you will return to your slide.
 
slideshort2

Shortcut #3: Jumping to a Slide in Your Presentation

When you give a presentation, your talk doesn’t always end up going according to plan. And you want to be prepared in case that happens.

slideshort3

There are some situations when you will need to jump around in your presentation. For instance, say you are on slide 50, and your audience puts a question that requires you to jump back to slide 20.

Pressing Page Up 30 times is time-consuming and looks unprofessional. That’s why PowerPoint has two handy methods for doing so efficiently.

The first method is to simply type the slide number in, and then hit Enter (Ex. “20 Enter”).

The second method is to use the All Slides dialog box. This feature allows you to visually see all the slides within your presentation so you can immediately jump to the correct one.

Ctrl + S (while in Slide Show Mode) will launch the All Slide dialog box.

Shortcut #4: Pen and Eraser

Ctrl + P (while in Slide Show Mode) will activate the pen, allowing you to write / draw on your slides. Hitting CTRL + P a second time will turn the Pen off.

Ctrl + E or E (while in Slide Show Mode) will erase all the ink on your slide.

slideshort4

Shortcut #5: Highlighter and Arrow

Ctrl + I (while in Slide Show Mode) will activate the highlighter, allowing you to highlight / draw on your slides.

Pressing Ctrl+A changes the pointer to the default arrow.
 
slideshort5

Shortcut #6: Activating the Laser Pointer

When giving your talk, you may have specific elements on your slide that you want to point out to your audience. One great way to do that is to use a laser pointer – and PowerPoint provides one directly within the software.

While in Slide Show Mode, hold down the CTRL+L key on your keyboard. Doing so turns on the laser pointer, allowing you to point out things on your slide and focus your audience’s attention.
 
slideshort6

Shortcut #7: Zoom in and zoom out To zoom into a slide in Slideshow View, simply hit + (Plus). Once zoomed in, you can use your Arrow keys to navigate around.

To zoom out of a slide or to see all slides in Slideshow View, simply hit – (minus). Once zoomed out, you can use your Arrow keys to navigate around.
 
slideshort7

Shortcut #8: Subtitle Pressing J will turn on or off subtitles.

slideshort8

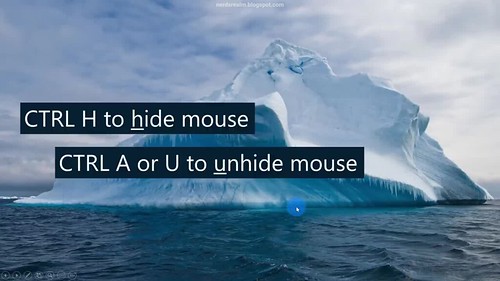
Shortcut #9: To hide or unhide mouse

To hide your pointer and navigation immediately, hit CTRL + H.

To unhide your pointer, hit CTRL + A or U.
 
slideshort9

Shortcut #10: Display shortcuts

Pressing F1 while in Slideshow mode, this command display all the different slide show shortcuts you can use to quickly navigate your presentation. If you ever forget your shortcut, just hit F1.
 
slideshort10

Shortcut #11: End the presentation

Press escape to end the presentation.
 
slideshort11
Gmail

Have you ever accidentally sent a message from your Gmail account, only to realize, seconds later, that you made a mistake? Whether you sent it to the wrong person or people, included incorrect information, or made a harsh, emotional response that you regret, the ability to get that message back is a very helpful tool. Luckily there is a feature that you can enable for your Gmail account which can recall your email.

Step 1: Launch your favorite browser and log into your Gmail account as you normally would.

Step 2: Next, click the cog icon in the upper-right corner of the screen and click See all settings from the drop-down menu.
 
vacares1

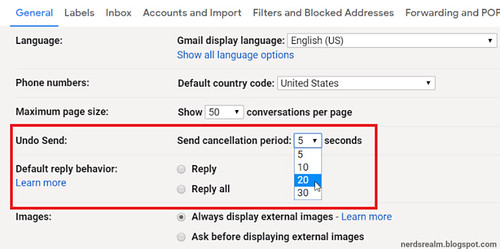
Step 3: The General tab is displayed. Scroll down and locate the "Undo Send" section. Click to check the box next to "Enable Undo Send and modify the cancelation period as per your need.
 
unsentgmail1

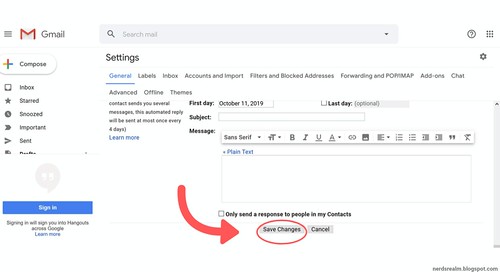
Step 4: Scroll to the bottom and click on the "Save Changes" button.
 
unsentgmail2

Now you will see a message at the bottom left of the screen after you send an email. You can click the Undo button to recall the email before it is sent.
wordtranslate1

Translate words or phrases in Word, Excel, or PowerPoint

Step 1: In your document, spreadsheet or presentation, highlight the cell or text you want to translate.

Step 2: Select Review > Translate > Translate selection or you can right click and Select Translate.

wordtranslate2

Step 3: Select your language "From and To" to see the translation.
 
wordtranslate3

Step 4: Select Insert. The translated text will replace the text you highlighted in step 1. 

To translate a whole file in Word, Excel, or PowerPoint.

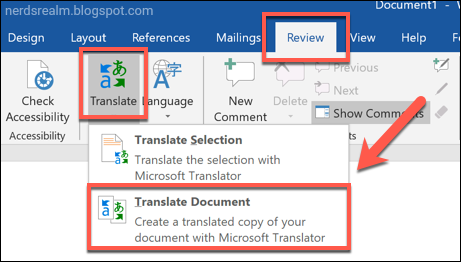
Step 1: Select Review > Translate > Translate Document.

wordtranslate4

Step 2: Select your language to see the translation.

 
wordtranslate5

Step 3: Select Translate. A copy of the translated document will be opened in a separate window.

Step 4: Select OK in the original window to close translator.

Emails come in throughout the day — sometimes at really inconvenient moments. If you don’t have the time to deal with an email when it appears or if you want to get back to it later and you’re afraid you’ll forget about it, you can use Gmail’s snooze feature.

Snoozing an email means that it will disappear for a while and then come back to the top of your inbox at a time you pick, as though you’re receiving it all over again.

Here’s how to snooze your emails.

Snooze Emails on Website

Step 1: Launch the Gmail website and open the email that you want to snooze.

Step 2: Click on the snooze icon at the top. It looks like a clock.

Step 3: Select the time until which you want to snooze the email. When you do that, the email will be removed from the inbox and taken to the Snoozed folder.


In case you want to snooze multiple emails, select the emails on the main screen and hit the snooze icon at the top. You can use this method for individual emails too.


To disable snooze on an email, you need to access it first. Once you are in the Snoozed folder, open the email that you want to unsnooze.

ytchapters01
For each of your uploaded videos, you can add video chapters. Chapters break up your video into sections, each with an individual preview. These chapters can help viewers by giving more info and context by allowing them to rewatch different parts of the video.

To turn on chapters for your video

Step 1: Sign in to YouTube.
 
Step 2: Go to the video you want to edit. 

Step 3: Select EDIT VIDEO under the video. 

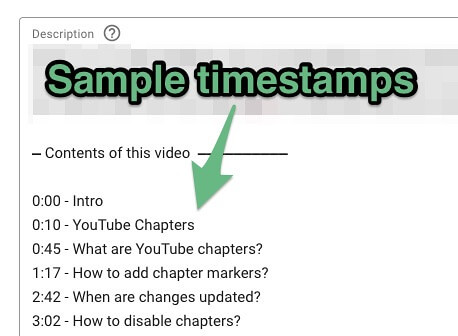
Step 4: In the “Description” box of the “Add details” page, add a list of timestamps and titles.

For example, you can add the following details as timestamps: 

0:00 Intro
3:14 Chapter 1
5:45 Chapter 2
8:05 Chapter 3
12:20 Final words

ytchapters02

To opt into video chapters, make sure that the first timestamp you list starts with 00:00. Your video should have at least three timestamps listed in ascending order.

The minimum length for video chapters is 10 seconds.

For videos over an hour - [hour:minute:seconds] [Chapter title]

For videos less than an hour - [minute:seconds] [Chapter title]

ytchapters03

Are chapters available in every country? 

According to YouTube, yes, they are. They are available in every country and every language.

How to disable YouTube chapters?

Just change the first timestamp from 00:00 to something else.

For example: 00:00 Intro ——> 00:03 Intro
msword

Getting the text document from a photo can be a long process if you do it manually. The good news is that this can be done automatically. 

Step 1: Open Microsoft Word.
You can do this by clicking its icon in the Start menu list of applications.

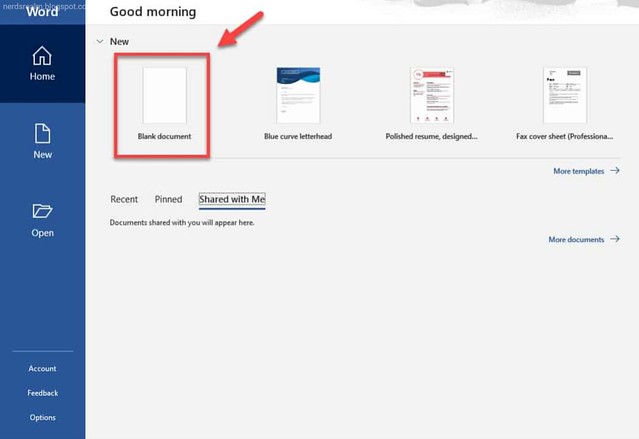
Step 2: Create a Blank document.
You can do this by clicking on “Blank document” located on the upper left side of the Word application.

pictoword1

Step 3: Drag the JPEG image to the Word document.
This will insert the photo to the document. Save the document as a PDF file.
 
pictoword2

Step 4: Save the document as a PDF file.
You can do this by clicking on File – Save As. Choose the download location then make sure that the “Save as type” is set to PDF(*.pdf).

pictoword3

Step 5: Open the PDF file using Word.
You can do this by clicking File – Open then browse for and click the PDF file.

pictoword4

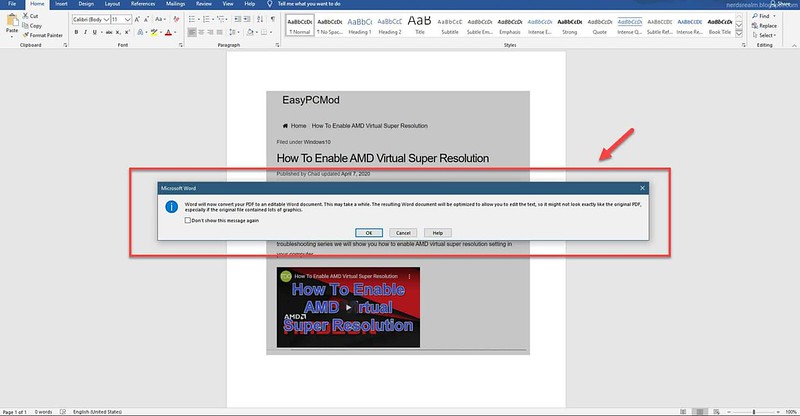
Step 6: Click OK on the new window that appears. 
Word will convert the PDF file to an editable Word document. The editable document will open in a new Word window.

pictoword5

After performing the steps listed above you will successfully convert image to Word document.
WhatsAppdarkmode1

Dark mode allows you to change the color theme of WhatsApp from white to black and can be enabled or disabled in your device settings or Control Center. This feature is available on iOS 13 and above. 

Step 1: Go to iPhone Settings.

WhatsAppdarkios1

Step 2: Tap Display & Brightness.
 
WhatsAppdarkios2

Step 3: Select from the following options under APPEARANCE:

  • Dark: Turn dark mode on.
  • Light: Turn dark mode off.
  • Automatic: Enable dark mode to turn on automatically at a specific time. Select Sunset to Sunrise or set a Custom Schedule.
 
WhatsAppdarkios3

Enable dark mode from Control Center

Step 1: Go to iPhone Settings > Control Center > Customize Controls.

Step 2: Add Dark Mode under INCLUDE to have it appear in Control Center.

Step 3: Open Control Center:

On iPhone X and newer, swipe down from the top right of the screen.

On iPhone 8 and older, swipe up from the bottom of the screen.

Step 4: Tap the dark mode icon to turn dark. mode on or off.
pictureback01

You can record your computer screen and related audio, and then embed it in your PowerPoint slide—or you can save it as a separate file.

To record and listen to audio associated with your screen recording, you'll need a sound card, microphone, and speakers.

Make sure there's enough disk space on your local drive to record and save your screen recording.

Step 1: Open the slide that you want to put the screen recording on.

Step 2: On the Insert tab of the ribbon, select Screen Recording.

record1

Step 3: On the Control Dock, click Select Area (Windows logo key+Shift+A), or, if you want to select the entire screen for recording, press Windows logo key+Shift+F. 

record2

Tip: PowerPoint automatically records the audio and the mouse pointer, so by default those options are selected on the control dock. To turn them off, deselect Audio (Windows logo key+Shift+U) and Record Pointer (Windows logo key+Shift+O).

Step 4: Click Record (Windows logo key+Shift+R). 

Tip: Unless you pin the Control Dock to the screen, it will slide up into the margin while you record. To make the unpinned Control Dock reappear, point the mouse cursor at the top of the screen.

Step 5: To control your recording:  

  • Click Pause to temporarily pause the recording (Windows logo key+Shift+R). 
  • Click Record to resume recording (Windows logo key+Shift+R).
  • Click Stop to end your recording (Windows logo key+Shift+Q).

record3

Step 6: When you are finished recording, save your presentation: File > Save. The recording is now embedded on the slide you selected in step 2.

To save the recording itself as a separate file on your computer, right-click the picture on the slide that represents the recording, and select Save Media as. In the Save Media As dialog box, specify a file name and folder location, then click Save.

 
record4
WhatsAppdarkmode1

Dark mode allows you to change the color theme of WhatsApp from white and green to more subtle shades of black and gray. This produces less glare at night, and makes WhatsApp more comfortable to use in low light conditions.

Darker screens also use less power. Finally, it just looks cool, and makes a refreshing change from all-white interfaces. It's always good to have more options.

First of all, you need to update your WhatsApp to the latest version available on the Google Play Store.

Step 1: Open WhatsApp and tap on the three dots located at the top right corner. 

Step 2: Tap on the Settings option.

Step 3: Open the ‘Chats’ option.

Step 4: Tap on the ‘Theme’ option.

Step 5: Enable Dark mode.

WhatsAppdarkmode2
pictureback01

Removing a Solid Color Picture Background in PowerPoint

The fastest way to remove an image background is to use the Set Transparent color tool. The only catch is this only works for removing solid colors, like white backgrounds.

pictureback02

Step 1: Insert and select a picture on your slide

Step 2: Navigate to the Picture Tools Format Tab.

Step 3: Open the Color drop down.
 
Step 4: Select the Set Transparent Color tool (your cursor becomes a little pen with an arrow)

Step 5: Click on the color you want to remove from your background.

pictureback03

When set transparent color doesn’t work

Example #1: This technique does not work well if your background and image are too similar in color.

pictureback04

Example #2: This technique does not well with gradient color backgrounds. 

Example #3: This technique does not work well with minute details like strands of hair or clothing. This also includes pixels around people’s hands, as pictured below.
 
pictureback05

Removing a complicated image background

 
pictureback06

Step 1: Select the desired image, then click the Format tab.

Step 2: Click the Remove Background command.

pictureback07

Step 3: PowerPoint will try to guess which part of the image is the background, and it will mark this area with a magenta fill. It will also place a box around the image with selection handles.

 
pictureback08

Step 4: Drag the selection handles until all of the foreground is inside the box. After you do this, PowerPoint may readjust the background.

Step 5: At this point, you may need to help PowerPoint decide which parts of the image are foreground and which parts are background. You can do this by using the Mark Areas to Keep and Mark Areas to Remove commands:

If PowerPoint has marked part of the foreground magenta, click Mark Areas to Keep and draw a line in that region of the image.
 
pictureback09

If part of the background has not been marked with magenta, click Mark Areas to Remove and draw a line in that region of the image. 
 
Step 6: After you add your marks, PowerPoint will readjust the image.
 
pictureback10

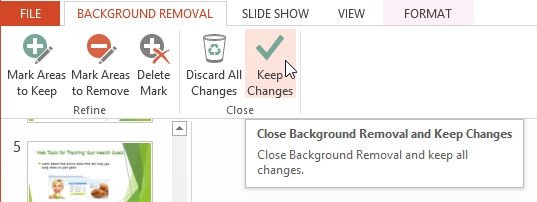
Step 7: When you're satisfied with the image, click Keep Changes.
 
pictureback11

Step 8: The background will be removed. You can adjust the image at any time by clicking the Remove Background command again.

 
pictureback12